Aperture, shutter speed and ISO all link together to make a photo interesting.
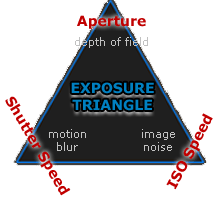
Aperture:
 In photography, an aperture is a hole in the camera lens where light can pass through. You are able to change the size of the aperture, and this allows you, along with the shutter speed (see below), to control how much light gets into the camera. Aperture is measured as 'F-Stop'. A low aperture (f/2.8) means the hole is wide open and lets a lot of light in. A small aperture (f/16) means the hole is small and lets little light in.
If you want a large depth of field, then the aperture needs to be small, so more light is available so you are able to see more of the landscape of the photo.
Shutter Speed:

Changing the shutter speed can show motion in a photo. 60th of a second is the slowest shutter speed a camera should be on if a photographer is not using a tripod, this is because anything below this number and your hands may being to shake, giving the photo a blurred effect which you might not want. 1000th of a second can take a photo of someone jumping in mid-air. This is because the shutter speed is so fast that it will not blur the photo. A fast shutter speed has a sharp effect, whereas a slow shutter speed gives a blurred effect. The photo on the right was taken by me while some students were walking past us. Although in my opinion this isn't a good photo, it is a good example of how changing the shutter speed on a camera can gave the effect of a photo.
ISO:
ISO is about adjusting the light in a photo. If a photo is taken in low light, you can increase the ISO so the photo can preserve more detail in the darker areas. If a photo is taken outside with a lot of light, the ISO should be low, so the photo is not too over exposed to light. However, when in low light and a photo is taken with a high ISO, then the photo will gain 'noise' (it will become grainy). Below are the photos that Me, Cassie and Mae took while testing out the ISO setting.


I took these photos of Cassie indoors. For the one on the left, I was using a high ISO. This means we are able to see her and her surroundings. Compared to the second photo, which is pretty much blacked out. You can just about make out the outline of her head. This is because the ISO is set to a low number.


These two photos were taken by Mae. Outside we had it set on a low ISO, giving us the result of the left hand photo. This picture has the right amount of light in it as we are able to see Cassie clearly. The right photograph was taken with a high ISO. This shows the exposure of the light, because the ISO was so high it makes most parts of the picture brighter and whiter, giving a not so clear photo. This is why it is important to make sure the correct setting is on the camera when taking certain photos.
The below photo was taken by Cassie. We were trying to find very dark areas of the school so we could see what was meant by the term 'noise'. Just outside our classroom I found this set of stairs, where it was very dark and would be perfect to try to get a grainy photo. Here is our example. Although the camera was set on a high ISO and the audience is able to see me, it's not very clear as you can see the grains in the photo.

White Balance:
- White balance is to do with the temperature of light
- This is measured in Kelvin's
- It tries to get the perfect white colouring
- Incandescent light makes the photo have a blue tinge if outside
- Florescent light makes a photo a darker blue
- These photos that I took show the difference in changing the white balance
- The second photo of the tree was set on the cloudy setting, and the first photo the camera is set on florescent light.
- The third photo was taken by me indoors, the first with the camera on an indoor setting and the second on florescent.


The Rule of Thirds:
- Uses the grid to line certain objects
- The horizon line should be on the bottom or top line
- The subject matter should be on a side, not in the middle, this makes a photo more interesting
Foreground Interest:
- Have a subject in the foreground not just in the background
- This gives a photo more depth
Depth of Field:

- This is to do with the aperture
- Landscape photography should have a large depth of field
- Large depth of field means that the whole photo is in focus
- Small depth of field means the background is out of focus
- I took this photo using a small depth of field, so we are focusing just on the thumb and the background is blurred

Leading Lines:
Leading Lines:
- Uses a line to guide the viewers eye to something in the background or off into the distance
- Could be a street or a path
Colour:
- Find a strong colour for the main photo
- Have a different colour for the main subject
Patterns:
- Find patterns for a more interesting photo
 HDR:
HDR:
HDR:
- Makes a photo look like a painting
- I took five photos using a tripod, two with a lot of light exposure, one normal and two with less light.
- I used the bracketing button on the camera to over and under expose the photos.
- After importing the five photos into Photoshop and using the merge HDR button I was brought to this page:

I then began to play around with making the photo look more like an HDR photography.

 Symmetry:
I then began to play around with making the photo look more like an HDR photography.
Symmetry: - Reflections in water disobey the rule of thirds but make for a more interesting photo
Time of Day:
- Light and shadow give a photo depth
- Colours are rich at dawn/dusk, making a photo more appealing
- Be aware of where the light falls
- I took this photo while I was on holiday in Cyprus in 2012
- The sunset gives a lot more colour to the sky and it is also reflected in the sea, and also, because the sun is setting, it has silhouetted the boy sitting down, making the photo more interesting

No comments:
Post a Comment